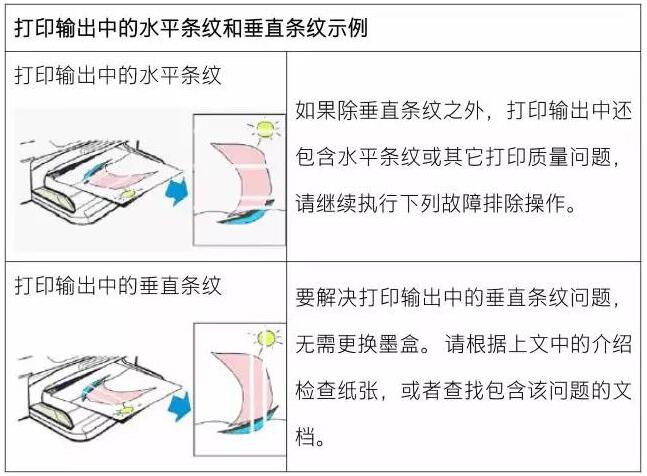
How to deal with inkjet printer failure?
What should I do if the inkjet fails? Here are a few tips for everyone, so that everyone can also rule out some printer failures.
Use original HP ink cartridges
Due to the different ink formulations, non-original ink cartridges do not meet the printing requirements. If a non-original ink cartridge is used in combination with a genuine ink cartridge, it may cause problems such as color cast, streaks, and plugging. If you use a non-HP original ink cartridge or a self-priming ink cartridge, we recommend that you replace it.
For non-HP original cartridges, HP does not provide quality or reliability guarantees. To ensure good print quality, it is recommended to use original HP ink cartridges.
For cartridges that use self-priming ink, it is recommended to replace them with original HP ink cartridges.
Check paper
If you encounter blurred images, streaks, etc. during printing, you can adjust them as follows:
Load the paper print side down into the input tray
Many papers distinguish between printed and non-printed surfaces, such as photo paper and other special media. Usually, the smoother side is the "printing surface", and the non-printing surface is sometimes labeled with the paper manufacturer.
Please use the paper type that matches the current print job
For everyday text documents, use plain paper with ColorLok technology. Paper using ColorLok technology is an industry standard paper that can be used with HP inks. Products using ColorLok technology are recommended.
Plain paper for text printing
For high-density printing, such as high-contrast images or photos, use HP Premium Photo Paper for best results.
Some media may not absorb ink like other media. If your prints are prone to stains, be sure to use the recommended paper.
Try using different types of paper
A print test with different types of paper will further determine if the problem is related to paper.
Note: Unsuitable paper usually causes vertical streaks in the printout (or if there is a problem with copying, it may be because the scanner glass is too dirty). To solve the vertical streak problem, there is no need to replace the cartridge.
Check the ink level and replace all ink cartridges with insufficient ink
In general, insufficient ink levels do not affect print quality. The split cartridge is suitable for HP commercial inkjet printers. It is made up of 4 colors of ink and each color is independent. When a certain color is consumed too much or the ink level is low, the printer can still perform a limited number of print jobs in "reserved mode". In reserve mode, the color of black and white prints may be a bit lighter, or the printout may be grayscale (gray, no color). If the print quality in the reservation mode is poor, replace all the ink cartridges with insufficient ink.
View estimated ink levels
The estimated ink level can be viewed from the control panel. On the printer control panel, touch the Ink Level Indicator icon and the control panel will display the estimated amount of ink.
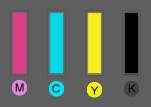
Ink level display, ink cartridge filled with ink
Note: The estimates provided by the ink level warnings and indicators are for the intended purpose only. When the ink level indicator shows insufficient ink, be prepared to replace the ink cartridge to avoid delays in printing. You do not need to replace the ink cartridge unless prompted.
Replace the ink cartridges: Replace any ink cartridges that are low on ink and try printing again. To install and replace the ink cartridge, click on the image below to view it.
Print and evaluate the print quality diagnostic page,
Solve printing problems: Print a print quality diagnostic page (referred to as the diagnostic page) to determine print quality problems.
Print a diagnostic page: Load plain white paper in the paper tray. On the printer control panel, slide the display to scroll to Settings and touch the Settings icon. Slide the display, scroll to Print Report, and touch Print Quality Report. Click on the Print Quality Report and the printer will print a diagnostic page.
Example: Print Quality Diagnostic Page
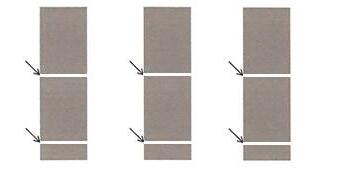
Check test pattern
Check the gray bar in the test pattern.
White gap appears in the gray bar in the test pattern
If the gray bar in the test pattern does not show black lines or white gaps at the arrow, skip to the solution check image.
If the gray bar in the test pattern shows a black line or white gap at the arrow, proceed to the next step: Align the printhead.
Calibrate the print head
Use automated tools to align printheads.
Load plain white paper in the paper tray.
Swipe down to open the dashboard and click the Settings icon.
Slide the display up and touch Printer Maintenance.
Click on "Calibrate Printhead".
Click "Calibrate Printhead" and then click "Continue".
Print another diagnostic page to determine if the issue has been resolved.
If there are no defects on the page, the problem is solved.
If the test pattern 1 still has black lines or white gaps at the arrow, proceed to the next step: Calibrate the line feed.
Calibration line feed
Use automated tools to calibrate line breaks.
1. On the printer control panel, slide the display to scroll to Settings, then touch the Settings icon
2. Slide the display, scroll to “Tools†and then touch “Toolsâ€.
3. Touch “Calibrate Line Feedâ€.
4. After the printer prints a test page, touch “OKâ€.

Test page example
5. Print another diagnostic page to determine if the issue has been resolved.
If there are no defects on the page, the troubleshooting ends here.
If the test pattern 1 still has black lines or white gaps at the arrow, send the printer for repair.
If the lines in test pattern 2 are not straight and discontinuous, proceed to the next step.
Check test pattern 2
Check test pattern 2 to see if the lines are vertical and continuous.

Test pattern 2
If the lines in Test Pattern 2 are vertical and continuous, skip to the next step: Check Test Pattern 3.
If the lines in test pattern 2 are not straight and discontinuous, align the printheads and print a diagnostic page.
If the ink cartridge is not used for a long time, or if it is in contact with the paper for a long time, dust and paper dust may accumulate on the print head, causing the print head to become clogged. When the print head is clogged, it may be necessary to clean the print head several times to restore print quality. Use the automation tool to clean the printhead through the control panel. In general, it is best not to perform cleaning more than 3 times.
1. On the home screen of the printer control panel, swipe down to open the dashboard, then touch the Settings icon.
2. Slide the display up and touch “Printer Maintenanceâ€.
3. Click “Clean Printhead†and then click “Continue†to print the test page.
4. Check the test page.
If the print quality is unacceptable, touch “Clean Again†to continue with the next cleaning step. Repeat the above steps in the third cleaning stage if necessary.
Note: If the printhead is heavily blocked, it may need to be cleaned again. If this is the case, wait for 30 minutes before performing three more levels of cleaning.
Aquarium Accessories,Aquarium Cleaning Kits,Aquarium Uv Lamp,Aquarium Thermometer
Shenzhen GAKO Aquatics Products Co., Ltd , https://www.gako-aquarium.com