Preparation of corrugated boxes before production (below)
Printing process sheet
The record items of the printing process sheet should be clearly recorded without omissions. Each item should correspond to a single printing process sheet. When using an interoperable version, if the design is different, a printing process sheet must be re-created. When a product is changed in print, changes must be made to the date, product name, product code, etc. at the same time as the design changes.
When making a printing process sheet, the horizontal and vertical printing positions are recorded in units of mm, and special attention should be paid when designing the position.
Prior to arranging plate processing, the technical designer must confirm the number of production equipment and materials used.
When affixing the edition, it shall be printed on the printing process sheet, and a yellow fluorescent pen shall be used to mark the post office for clear identification. In addition, the date and batch number also serve as a replacement version.
The printing process sheet is generally printed in the same color as the actual printing color to distinguish the colors. In the first production, the confirmed correct color is sampled and pasted on the printing process sheet so that the next production is used as a reference sample.
Making a printed version of the school draft
In order to ensure the accuracy of the printing plate and improve the efficiency of the printing process, it is necessary to confirm the accuracy of the printing plate before printing. This requires the production of a proof sheet for proofreading.
Print proofs are sampled from the printing plate attached to the film. Whether 2-color printing or multi-color printing, sampling is performed on a proof sheet.
First, outline lines should be drawn on the proof sheet according to the size of the carton opening. Since the extension of the printing plate occurs in the circumferential direction of the printing plate, the expansion ratio of the printing plate is added at the time of manufacture. Therefore, the proof must be a reduced size line according to the development size of the carton.
In special cases such as handle holes or tear strips, it is necessary to specify in the proof. Print the manufacturer's name and production date of the printing plate on the proof.
Print the color of proofs using similar colors. If you change the print or print plate again, you need to take another sample.
Confirm the check mark for registration: registration mark, plate number, and printing color.
Necessary tools and materials: Completion of the printed version, proofing paper with carton size lines, squeegee, ink pad (minimum: basic 7 colors + black) and scraper.
Preparation: Place the finished printing plate on the work table. Start with the colors that are not easily sampled. Dirty dust is removed from the surface of the printing plate with a wet rag, regardless of the order of production.
Place a proof sheet on the prepared printing plate, align the center line of the printing plate, the proof sheet, and the carton size line. In order to prevent the work from being stopped halfway, the corners are fixed with heavy objects.
The proofing paper is rolled up, ink is coated on the printing plate with a squeegee roller, and the ink of the same color is used as much as possible and actually produced, and ink is uniformly applied on the surface of the printing plate.
Cover the proof and press lightly to make it completely in contact with the plate. Take care not to move proofing paper, scrape gently and uniformly with a squeegee. After the plates were all sampled, the proofs were removed. Check the completion status of the printing plate. If there are no problems, perform the next color operation.
Samples of the second and third color plates are sampled in the same way as the first color.
Check if the centerlines and dimension lines of the plate and proofing paper are aligned.
Design drawing cards and proofs corrections to confirm the contents of the plates and the status of completion.
We enter plate maker name and production date.
Printed version proof management process
Printed version proofs are generally produced by the plate making company. The completion time of the printed version of the school draft is synchronized with the required completion time of the printing version (generally, the drawing is completed within 30 hours after the confirmation, and the urgent situation is in accordance with the customer's order requirements).
Confirmation of printed version of proofs
The proofs of the printed version of the school draft are first confirmed by the producer and then signed and confirmed in the “Manufacturer†column of the school draft, and the date of manufacture is filled in.
After the producer confirms, the proofs of the printed edition require a copy of the printed drawings to be submitted to the relevant business personnel for confirmation of the layout (including text and graphics), printing position and size. The business personnel shall be responsible for the above confirmation contents directly and check with the printed drawings. , and use red one by one to identify, after correct, in the school sample draft "business personnel" column to sign and confirm, and fill in the confirmation date.
The printed version of the proofs confirmed by the business personnel shall be forwarded to the technical personnel, and the size of the products and the position of the anti-slip strips shall be subjected to a process check, and after the correctness, be signed and confirmed in the “Technical personnel†column of the school draft, and the confirmation date shall be filled in. If errors are found in the printed version of the proof, feedback should be given immediately to the creator for correction.
The verification time of the printed version of the school draft is determined to have been confirmed within the day of receipt of the proof sheet of the printed version.
The use and preservation of printed version proofs
Any new or changed product is required to use a hard copy proof.
Printed copies of the proofs can be used only after they have been signed and confirmed by the three parties. They are indispensable. If the signatures are incomplete, the printing presses should refuse production and contact the relevant departments.
The printed version of the school draft should be kept together with the printed drawings.
Print production standards
Printed version of paper and non-slip strips
When the corrugated cardboard is encountered in a cardboard printing with a small width, in order to ensure the smoothness of the printing machine into the cardboard and the precision between the colors during printing, a printing plate and a non-slip strip are required to be attached on the printing plate.
Also note that there is no need to add a paper plate and a non-slip strip when printing in the full-length field, and there is no need to add a paper-feeding plate when printing in full-text version.
The minimum size requirement for corrugated board width is determined according to the actual situation of the company's printing press. The paper feed version is generally attached to the pressure lines of Article 2, Article 3, and Article 4, and a total of 3 papers are posted. (As shown in Figure 1)

The height requirement of the feed version is 1mm lower than the print version, and the width is generally 10mm. The upper and lower ends of the paper feed plate are longer than the paperboard, but since the upper and lower ends are prone to warp, contact with the ink roller may cause the ink to contaminate the corrugated paperboard. Therefore, both ends of the feed plate need to be chamfered and pasted. (as shown in picture 2)
When the corrugated board is small and the printing of a certain color is small, difficulties arise in feeding the board from the printing plate. In this case, it is difficult for the paper feeding plate to slide at a high speed and maintain synchronization. It is also necessary to place anti-slip strips at both ends of the cardboard. The anti-slip strip is attached to the outer edge of the tongue and the outer surface of the fourth trimming position is 3mm. (As shown in Figure 3)
When sticking anti-slip strips, care must be taken not to stick the printing plate to the edges of the first and fourth sides to prevent the ink from contaminating the cardboard. The height of the anti-slip strip is the same as the height of the printing plate, and the width is 10 mm.
Both the feed plate and the anti-slip strip are fixed with a seal paste. When printing a small number of colors or a blank box, there is no anti-slip strip for the printing plate of the printing plate, and two non-slip plates are fixed for each color. Generally, the gap is 500 mm.
Printing plate pasting and sealing
Corrugated box companies generally use adhesive tape around the printing plate for edge-sealing. Over time, the tape can easily curl up, and because the tape itself has a certain thickness, it will result in printing a dirty version.
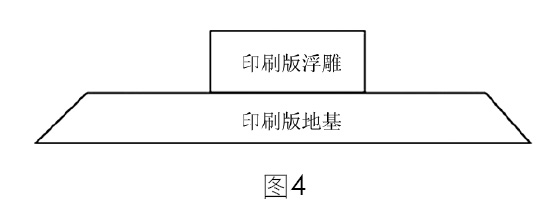
Appropriate printing plate pasting and edge-sealing processing to do the following: First, the printing plate is affixed with double-sided adhesive tape, the printing plate layout content is correct, the printing plate is complete, between the double-sided tape and the printing plate on the back of the printing plate. Without leaving any gaps, the paste should be smooth and no individual areas should be allowed to stand out or there should be extra lines. Then cut the printing plate around the slope, use the sealant glue to seal around, prohibit the use of tape sealing, when the sealant to paste the printing plate firmly, to ensure no loosening, off phenomenon, so that the printing plate edge is not A dirty print will appear. (As shown in Figure 4: Schematic illustration of the printing plate)
Printed standard line requirements
There are five standard lines for the printing plate: the operating side mark line, the center line, the finished edge line, the inspection mark, and the carton expansion drawing outline.
Attach red tape on the back side of the operation side of the printing plate or add printing direction arrows and mark the center line (the position of the center line should be accurate). This can guide the printing personnel to print quickly and accurately, save time and improve work efficiency.
The distance from the edge of the incoming hang-up bar to the upper edge of the finished product is generally set to 100mm, and the position is marked as the reference line for typesetting.
For ease of layout, a corrugated box can be drawn on the hanging film to expand the outline of the outline. The outline of the outline should be in the direction of the reduced size of the corrugated box, and the left and right sides are the actual dimensions.
Check mark
Die-cutting positioning lines: For die-cut printing plates, “L†marks are marked around the corrugated cardboard to check whether the printing offset occurs, ensuring overprinting accuracy, and greatly reducing the alignment of corrugated cardboard for die-cutting. The time spent printing the position. (As shown in Figure 5: "L" logo)
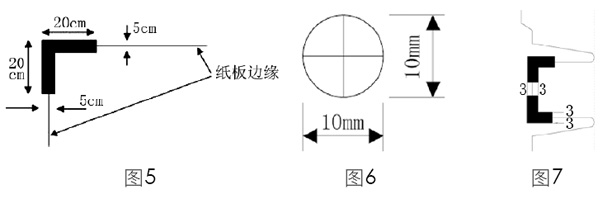
Color Alignment Marks (Cross Marks): Color Alignment Marks can make printing misalignment, misalignment between colors easy to check, and need to be affixed to each color plate through each product of the printing press, generally 10mm in diameter. (As shown in Figure 6: Cross mark)
The color registration mark is generally printed on the flap portion of the carton, and the die cut box should be printed on the cut-out portion. However, with the consent of the customer, it can also be printed on the inside flap.
Die-cut shift inspection mark: Marking the inner flap of the carton to make the die-cut displacement easy to check. It is worth noting that the die-cut shift check mark must be approved by the customer. (As shown in Figure 7: Die-cut shift inspection mark) Standard requirements for hanging film and hanging plate: The cracking phenomenon is not allowed for the hanging plate, and hot-melt adhesive bonding is used for the hanging plate and the hanging plate. , And fixed with fiber tape, hanging plate does not allow the phenomenon of fracture.
Stick-in version: In principle, no stick-change version is used. In the case of affixed editions, it is generally required that one set of printing plates should have no more than four replacement locations.
Plate number and color: The plate number and color are added to make it easy to detect the printing error. The plate number is the same as the number of the printing process sheet, and it is the same as the number on the plate rack. When using a printing plate transferred from another company, it is generally necessary to retype the printing equipment in accordance with the company's printing equipment and correct it to the same style as the company's process. When used as it is without affecting the design, it should be approved by the customer.
Die cutting process sheet
For each set of die cuts, a die cut process sheet shall be prepared and a unique number shall be prepared. The items recorded in the die-cutting process list shall be clearly and unambiguously recorded and shall include the following items: the direction of the corrugation, the direction of die-cutting pass, the indication pressure lines, the strength of the indicated pressure lines, the flattening of the crucible, the printing position, and the die cutting Position reference, indicating half cutter, indicating half or full cut of the interrupted knife, indicating knife starting or crimping starting position of the interrupted knife or interval pressure line, indicating that there must be no connected part, indicating 180° specified by the customer The type of bending, reverse bending, and crimping.
It should be noted that the die cutting process sheet is kept together with the production process unit.
Die-cutting production standards
The die number, die cut number, and die cut safe should be the same number.
Flattening die-cut version reference
According to the die cutting equipment to determine the starting point of the knife (A), generally about 20mm. In the die-cut version of the operating side part of the red line logo, in the die-cut version of the following items: die-cut version of the manufacturer, die-cut version number, tool and pressure line type, shape (high, wide), knife The total length (in mm) represents the knife's connection (red arrow), standard die-cutting pressure. (Figure 8)
Round press die-cut version
The size of the first knife is A size. When the trimming part is 10mm, the distance between the first mounting screw hole and the first knife is 35mm. (Figure 9)

Put a red line on the side of the die-cut version, and center the middle line. The following items are indicated on the die-cut version: the die-cut manufacturer's name, the die-cut version number, and the connector (red arrow) indicating the knife.
Acceptance of die-cut version
The die-cut manufacturer is required to deliver the die-cut version and the designated delivery note in a complete package, and check the die-cutting samples, die-cutting plates, and die-cutting process list.
Eliminating unwanted craft sheets
For a list of unused processes for a year, the list is listed once a month as a disposal target. The list of process orders will be submitted to the business staff for confirmation, and will be processed after discarded consent.
Plates, die-cuts, printing process sheets, die-cutting sheets, products and other related items are also processed at the same time. If the product code cannot be eliminated immediately, the process sheet must be retained and noted in the notes.
(End of the article)
Roll Up Banners named as Pull Up Banner ,retractable banners. The obvisous feature is retractable if we do not need the banner. It won`t occupy much space. So many retailers use them in their stores and trade show .

- Photographic Quality - Hi Resolution Print 1440dpi
- Lightweight Silver Aluminum Base 2.3kg for standard ,4.5kg for luxury ,5.5kg for double sides
- Handy Black Oxford Fabric Carry Bag
The assemble of pull up banners :
1. Turn image with picture side facing downwards
2. Peel back a small amount of protective strip on the top profile
3. Place the top profile against the upper edge of the image and remove the protective strip ,Press firmly
4. Remove the white protective strip ,Apply the image with picture side facing upwards,Follow the black line.
Apply extra tape over the joint on both sides
5. Press the image with a firm grip against the tube with left hand remove the locking pin.NOTE ,The mechanisms now activated
6. Hold the image with both hands according to sketch ,let the image carefully roll into the tube
7. Place the pin in the clips under the tube
Changing of Image :
Remove the locking pin from the clips under the tube
Pull out the image as far as possible
Adjust the length so that the locking pin fits into the hole at the side of the tube
Lock the mechanism with the lockking pin
Remove the old image
Follow the instructions from 1-7
Please contact with Angelina Xu , she will send you the video to show you to apply the banner to the roll banner stand. Whatsapp : 0086 13427921037
Roll Up Banners,Waterproof Roll Up Banners,Pull Up Banner
Golden Mouth Advertising (H.K)Co.,Ltd. ( Jie Da Advertisement Co.,Ltd) , https://www.advertisingflagbanners.com